This article was originally published at opensource.com.
If you work with Git as your version control system, you’ve likely already resigned yourself to the fact that Git is a complicated beast. Git is a fantastic tool, but it can be cumbersome to navigate repositories, logs, the stash, etc. That’s where a tool like Tig comes in.

"Git icon" by Jason Long is licensed under CC BY 3.0 .
Related posts: I’ve also discussed Four Strategies for Context Switching in Git and Autocorrecting Git Commands.
From the Tig man page:
Tig is an ncurses-based text-mode interface for git(1). It functions mainly as a Git repository browser, but can also assist in staging changes for commit at chunk level and act as a pager for output from various Git commands.
This basically means that Tig provides a text-based user interface you can run in your terminal. Tig makes it easy to browse your Git logs, but it can do much more than just bounce you around from your last commit to a previous one.
Many of the examples in this quick introduction to Tig have been poached directly from its excellent man page. I highly recommend reading it to learn more.
Install Tig#
- Fedora and RHEL: sudo dnf install tig
- Ubuntu and Debian: sudo apt install tig
- MacOS: brew install tig
See the official installation instructions for even more options.
Browse commits in your current branch#
If you want to browse the latest commits in your branch, enter:
tig
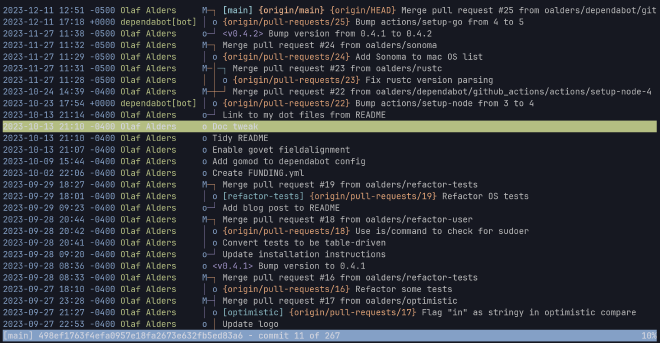
That’s it. This three-character command will launch a browser where you can navigate the commits in your current branch. You can think of it as a wrapper around git log.
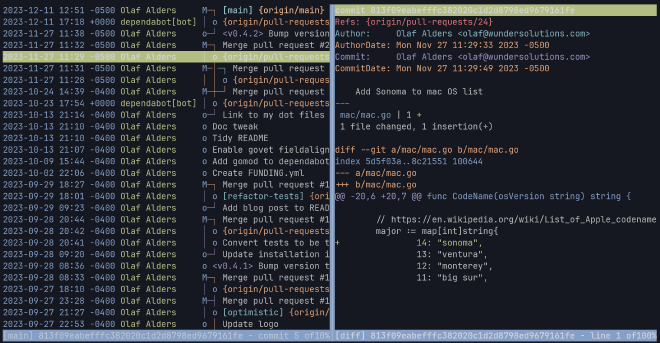
To navigate the output, you can use the Up and Down arrow keys to move from one commit to another. Pressing the Return/Enter key will open a vertical split with the contents of the chosen commit on the right-hand side. You can continue to browse up and down in your commit history on the left-hand side, and your changes will appear on the right. Use k and j to navigate up and down by line and - and the Space Bar to page up and down on the right-hand side. Use q to exit the right-hand pane.
Searching on tig output is simple as well. Use / to search forward and ? to search backward on both the left and right panes.
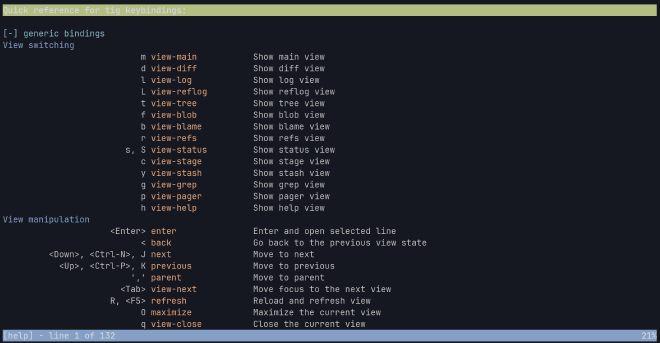
That’s enough to get you started navigating your commits. There are too many key bindings to cover here, but clicking h will display a Help menu where you can discover its navigation and command options. You can also use / and ? to search the Help menu. Use q to exit Help.
Browse revisions for a single file#
Since Tig is a wrapper around git log, it conveniently accepts the same arguments that can be passed to git log. For instance, to browse the commit history for a single file, enter:
tig README.md
Compare this with the output of the Git command being wrapped to get a clearer view of how Tig enhances the output.
git log README.md
To include the patches in the raw Git output, you can add a -p option:
git log -p README.md
If you want to narrow the commits down to a specific date range, try something like this:
tig --after="2017-01-01" --before="2018-05-16" -- README.md
Again, you can compare this with the raw Git version:
git log --after="2017-01-01" --before="2018-05-16" -- README.md
Browse who changed a file#
Sometimes you want to find out who made a change to a file and why. The command:
tig blame README.md
is essentially a wrapper around git blame. As you would expect, it allows you to see who the last person was to edit a given line, and it also allows you to navigate to the commit that introduced the line. This is somewhat like the :Gblame command Vim’s vim-fugitive plugin provides.
Browse your stash#
If you’re like me, you may have a pile of edits in your stash. It’s easy to lose track of them. You can view the latest item in your stash via:
git stash show -p stash@{0}
You can find the second most recent item via:
git stash show -p stash@{1}
and so on. If you can recall these commands whenever you need them, you have a much sharper memory than I do.
As with the Git commands above, Tig makes it easy to enhance your Git output with a simple invocation:
tig stash
Try issuing this command in a repository with a populated stash. You’ll be able to browse and search your stash items, giving you a quick overview of everything you saved for a rainy day.
Browse your refs#
A Git ref is the hash of something you have committed. This includes files as well as branches. Using the tig refs command allows you to browse all of your refs and drill down to specific commits.
tig refs
When you’re finished, use q to return to a previous menu.
Browse git status#
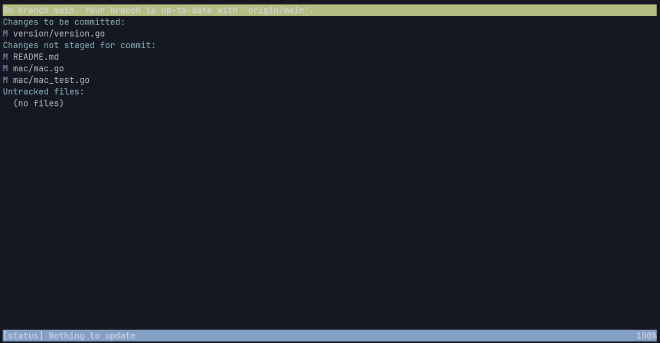
If you want to view which files have been staged and which are untracked, use tig status, a wrapper around git status.
Browse git grep#
You can use the grep command to search for expressions in text files. The command tig grep allows you to navigate the output of git grep. For example:
tig grep -i foo lib/Bar
will navigate the output of a case-insensitive search for foo in the lib/Bar directory.
Pipe output to Tig via STDIN#
If you are piping a list of commit IDs to Tig, you must use the --stdin flag so that tig show reads from stdin. Otherwise, tig show launches without input (rendering an empty screen).
git rev-list --author=olaf HEAD | tig show --stdin
Add custom bindings#
You can customize Tig with an rc file. Here’s how you can configure Tig to your liking, using the example of adding some helpful custom key bindings.
Create a file in your home directory called .tigrc. Open ~/.tigrc in your favorite editor and add:
# Apply the selected stash
bind stash a !?git stash apply %(stash)

# Drop the selected stash item
bind stash x !?git stash drop %(stash)
Run tig stash to browse your stash, as above. However, with these bindings in place, you can press a to apply an item from the stash to your repository and x to drop an item from the stash. Keep in mind that you’ll need to perform these commands when browsing the stash list. If you’re browsing a stash item, enter q to exit that view and press a or x to get the effect you want.
For more information, you can read more about Tig key bindings.
Wrapping up#
I hope this has been a helpful demonstration of how Tig can enhance your daily workflow. Tig can do even more powerful things (such as staging lines of code), but that’s outside the scope of this introductory article. There’s enough information here to make you dangerous, but there’s still more to explore.
